들어가며
최근 많은 웹 애플리케이션에서 JWT(JSON Web Token)를 활용한 인증 방식을 채택하고 있습니다. 이번 포스트에서는 Spring Security와 JWT를 결합하여 안전하고 효율적인 인증 시스템을 구현하는 방법을 실제 프로젝트 코드를 기반으로 상세히 알아보겠습니다.
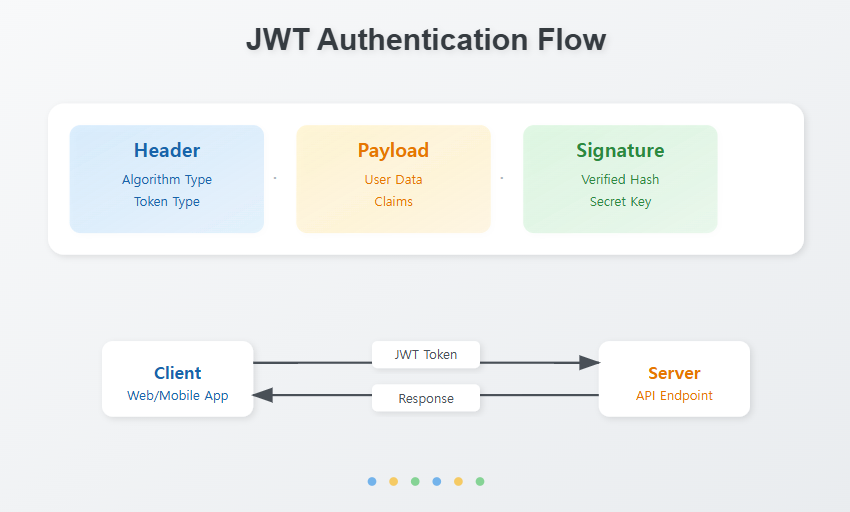
JWT(JSON Web Token)의 이해
JWT란?
JWT(JSON Web Token)는 당사자 간 정보를 안전하게 JSON 형태로 전송하기 위한 개방형 표준(RFC 7519)입니다. 특히 인증과 정보 교환에 많이 사용되며, 자체적으로 필요한 모든 정보를 포함하는 독립적인 방식을 제공합니다.
JWT의 상세 구조
JWT는 세 부분으로 구성되며, 각 부분은 점(.)으로 구분됩니다:
- Header (헤더)
1
2
3
4
| {
"alg": "HS256",
"typ": "JWT"
}
|
alg: 서명 알고리즘 지정 (예: HMAC SHA256, RSA)typ: 토큰의 타입을 지정
- Payload (페이로드)
1
2
3
4
5
| {
"sub": "1234567890",
"name": "John Doe",
"iat": 1516239022
}
|
- 클레임(claim)이라 불리는 엔터티의 정보를 포함
- 등록된 클레임, 공개 클레임, 비공개 클레임으로 구분
- Signature (서명)
- Header와 Payload를 Base64URL로 인코딩하고, 비밀키를 사용하여 서명을 생성
1
2
3
4
5
| HMACSHA256(
base64UrlEncode(header) + "." +
base64UrlEncode(payload),
secret
)
|
Spring Security 설정 상세 분석
SecurityConfig 클래스 구조
1
2
3
4
5
6
7
8
9
10
11
12
13
14
| @Slf4j
@Configuration
@EnableWebSecurity
@EnableMethodSecurity
@RequiredArgsConstructor
public class SecurityConfig {
private final JwtAuthenticationFilter jwtAuthenticationFilter;
private final ObjectMapper objectMapper;
@Bean
public SecurityFilterChain securityFilterChain(HttpSecurity http) throws Exception {
// Security 설정
}
}
|
각 어노테이션의 역할:
@Configuration: Spring의 설정 클래스임을 나타냄@EnableWebSecurity: Spring Security 설정을 활성화@EnableMethodSecurity: 메소드 수준의 보안을 활성화@RequiredArgsConstructor: 필요한 의존성을 자동으로 주입
SecurityFilterChain 상세 분석
1. CSRF 설정
1
| .csrf(csrf -> csrf.disable())
|
- CSRF(Cross-Site Request Forgery) 보호를 비활성화
- JWT 기반 인증에서는 CSRF 토큰이 불필요
- Stateless한 REST API의 특성상 CSRF 공격에 덜 취약
2. CORS 설정
1
2
3
4
5
6
7
8
9
10
11
12
13
14
15
16
| .cors(cors -> cors.configurationSource(corsConfigurationSource()))
@Bean
public CorsConfigurationSource corsConfigurationSource() {
CorsConfiguration configuration = new CorsConfiguration();
configuration.setAllowedOrigins(Arrays.asList("http://localhost:3000"));
configuration.setAllowedMethods(Arrays.asList("GET", "POST", "PUT", "DELETE", "OPTIONS"));
configuration.setAllowedHeaders(Arrays.asList("Authorization", "Content-Type"));
configuration.setExposedHeaders(Arrays.asList("Authorization"));
configuration.setAllowCredentials(true);
configuration.setMaxAge(3600L);
UrlBasedCorsConfigurationSource source = new UrlBasedCorsConfigurationSource();
source.registerCorsConfiguration("/**", configuration);
return source;
}
|
CORS 설정 상세 분석:
setAllowedOrigins: 프론트엔드 도메인 허용setAllowedMethods: 허용할 HTTP 메소드 지정setAllowedHeaders: 허용할 헤더 지정setExposedHeaders: 클라이언트에 노출할 헤더setAllowCredentials: 인증 정보 포함 허용setMaxAge: preflight 요청 캐시 시간
3. 세션 관리
1
2
| .sessionManagement(session ->
session.sessionCreationPolicy(SessionCreationPolicy.STATELESS))
|
- JWT는 상태를 저장하지 않는 인증 방식
- 세션을 생성하지 않도록 STATELESS로 설정
- 서버의 메모리 사용을 최적화
4. 보안 컨텍스트 설정
1
2
3
4
5
6
| .securityContext(context -> context
.securityContextRepository(new DelegatingSecurityContextRepository(
new RequestAttributeSecurityContextRepository(),
new HttpSessionSecurityContextRepository()
))
)
|
- 보안 컨텍스트 저장소 설정
- 요청 속성과 HTTP 세션을 모두 지원하도록 구성
5. 요청 권한 설정
1
2
3
4
5
6
7
8
9
10
11
12
| .authorizeHttpRequests(auth -> auth
.requestMatchers(
"/api/users/signup",
"/api/users/login",
"/v3/api-docs/**",
"/swagger-ui/**",
"/swagger-resources/**",
"/swagger-ui.html",
"/webjars/**"
).permitAll()
.anyRequest().authenticated()
)
|
- 공개 API 엔드포인트 설정
- Swagger UI 관련 경로 허용
- 나머지 모든 요청은 인증 필요
6. 예외 처리
1
2
3
4
5
6
7
8
9
10
11
12
13
14
15
| .exceptionHandling(exception ->
exception.authenticationEntryPoint((request, response, authException) -> {
log.error("Authentication error: {}", authException.getMessage());
response.setStatus(HttpServletResponse.SC_UNAUTHORIZED);
response.setContentType("application/json;charset=UTF-8");
Map<String, Object> errorDetails = new HashMap<>();
errorDetails.put("timestamp", new Date());
errorDetails.put("status", HttpServletResponse.SC_UNAUTHORIZED);
errorDetails.put("error", "Unauthorized");
errorDetails.put("message", "인증에 실패했습니다");
errorDetails.put("path", request.getRequestURI());
response.getWriter().write(objectMapper.writeValueAsString(errorDetails));
}));
|
- 인증 실패 시의 처리 로직
- JSON 형식의 에러 응답 생성
- 상세한 에러 정보 포함
JWT 인증 필터 구현 상세 분석
JwtAuthenticationFilter 클래스 구조
1
2
3
4
5
6
7
8
9
10
11
12
13
14
| @Slf4j
@Component
@RequiredArgsConstructor
public class JwtAuthenticationFilter extends OncePerRequestFilter {
private final JwtUtil jwtUtil;
private final ObjectMapper objectMapper;
@Override
protected void doFilterInternal(HttpServletRequest request,
HttpServletResponse response,
FilterChain filterChain) throws ServletException, IOException {
// JWT 검증 및 인증 처리
}
}
|
주요 메소드 분석
1. doFilterInternal
1
2
3
4
5
6
7
8
9
10
11
12
13
14
15
16
17
18
19
20
21
22
23
24
25
| @Override
protected void doFilterInternal(HttpServletRequest request,
HttpServletResponse response,
FilterChain filterChain) throws ServletException, IOException {
try {
String token = extractToken(request);
if (!shouldNotFilter(request) && token == null) {
handleAuthenticationException(response,
new AuthenticationCredentialsNotFoundException("토큰이 없습니다."));
return;
}
if (token != null) {
String username = jwtUtil.getUsernameFromToken(token);
Authentication authentication = createAuthentication(username);
SecurityContextHolder.getContext().setAuthentication(authentication);
log.debug("Successfully authenticated user: {}", username);
}
filterChain.doFilter(request, response);
} catch (Exception e) {
log.error("Authentication error:", e);
SecurityContextHolder.clearContext();
handleAuthenticationException(response, e);
}
}
|
주요 처리 단계:
- 토큰 추출
- 보호된 엔드포인트 체크
- 토큰 유효성 검증
- 인증 객체 생성 및 설정
- 예외 처리
2. createAuthentication
1
2
3
4
5
6
7
8
9
10
11
12
13
| private Authentication createAuthentication(String username) {
UserDetails userDetails = User.builder()
.username(username)
.password("")
.roles("USER")
.build();
return new UsernamePasswordAuthenticationToken(
userDetails,
null,
userDetails.getAuthorities()
);
}
|
- UserDetails 객체 생성
- 인증 토큰 생성 및 권한 설정
3. handleAuthenticationException
1
2
3
4
5
6
7
8
9
10
11
12
| private void handleAuthenticationException(HttpServletResponse response, Exception e) throws IOException {
response.setStatus(HttpServletResponse.SC_UNAUTHORIZED);
response.setContentType("application/json;charset=UTF-8");
Map<String, Object> errorDetails = new HashMap<>();
errorDetails.put("timestamp", new Date());
errorDetails.put("status", HttpServletResponse.SC_UNAUTHORIZED);
errorDetails.put("error", "Unauthorized");
errorDetails.put("message", "인증에 실패했습니다: " + e.getMessage());
response.getWriter().write(objectMapper.writeValueAsString(errorDetails));
}
|
- 인증 실패 시 응답 처리
- 상세한 에러 메시지 포함
- JSON 형식의 응답 생성
4. shouldNotFilter
1
2
3
4
5
6
7
8
9
10
| @Override
protected boolean shouldNotFilter(HttpServletRequest request) {
String path = request.getRequestURI();
return path.startsWith("/api/users/login") ||
path.startsWith("/api/users/signup") ||
path.startsWith("/swagger-") ||
path.startsWith("/v3/api-docs") ||
path.equals("/") ||
path.startsWith("/error");
}
|
- 필터를 적용하지 않을 경로 지정
- 공개 API 경로 처리
1
2
3
4
5
6
7
| private String extractToken(HttpServletRequest request) {
String bearerToken = request.getHeader("Authorization");
if (bearerToken != null && bearerToken.startsWith("Bearer ")) {
return bearerToken.substring(7);
}
return null;
}
|
- Authorization 헤더에서 토큰 추출
- Bearer 스키마 확인
전체 인증 프로세스 흐름
- 클라이언트 요청 시작
- Authorization 헤더에 JWT 포함하여 요청
- JwtAuthenticationFilter 동작
- 요청 URI 확인 (shouldNotFilter)
- 토큰 추출 (extractToken)
- 토큰 유효성 검증
- 인증 처리
- 토큰에서 사용자 정보 추출
- Authentication 객체 생성
- SecurityContext에 인증 정보 설정
- 요청 처리
- 인증된 사용자 정보로 요청 처리
- 적절한 응답 반환
보안 고려사항
1. 토큰 보안
- 적절한 만료 시간 설정
- 안전한 시크릿 키 관리
- 토큰 갱신 메커니즘 구현
2. 통신 보안
- HTTPS 사용 필수
- 민감한 정보의 암호화
- 적절한 CORS 설정
3. 에러 처리
- 상세한 에러 로깅
- 사용자 친화적인 에러 메시지
- 보안 관련 정보 노출 방지
구현 시 주의사항
- 토큰 관리
- 토큰 저장소 구현 고려
- 토큰 블랙리스트 관리
- 토큰 갱신 전략 수립
- 성능 최적화
- 캐시 활용
- 불필요한 DB 조회 최소화
- 효율적인 예외 처리
- 테스트
- 단위 테스트 구현
- 통합 테스트 수행
- 보안 취약점 테스트
마치며
이상으로 Spring Security와 JWT를 활용한 인증 시스템 구현에 대해 상세히 알아보았습니다. 이 구현은 현대적인 웹 애플리케이션에서 요구되는 안전하고 확장 가능한 인증 시스템을 제공합니다. 실제 프로젝트에 적용할 때는 비즈니스 요구사항과 보안 요구사항을 잘 고려하여 적절히 커스터마이징하시기 바랍니다.